


1. INSTALLING YOUR ROUTER
- Connect the power adapter to the Router and wait for the Alert LED to stop flashing.
- Ensure that your modem and computer are both switched on.
- Insert one end of the supplied Ethernet (RJ-45 Category 5) cable into the Cable/DSL port on the rear panel of the Router.
- Insert the other end of the cable into the RJ-45 port on your cable or DSL modem. Check that the Cable/DSL status LED lights on the Router.
- Connect the cable or DSL modem to the Internet.
- Connect your computer to one of the four LAN ports on the Router using an Ethernet cable. Check that the corresponding LAN status LED on the Router lights.
To share your Router with more than four users you will need an additional Switch. Connect a LAN port of your Router to the Switch, e.g. 3Com Switch 8 (3CFSU08).

2. CHANGING YOUR COMPUTER'S CONFIGURATION
Obtaining an IP Address automatically.Follow the instructions below for your particular operating system to ensure that your computers are configured to obtain an IP address automatically.
For computers using Windows Vista.
- From the Windows Start menu, select “Control Panel”.
- Click on “View Network and task” which is under “Network and Internet Connections”.
- Click on “Manage Network Connections”.
- Right click on “Local Area Connection Status” and select “Properties” from the pull down menu.
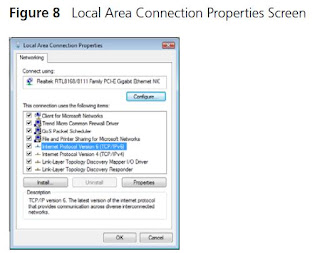
- Select “Internet Protocol version 4 (TCP/IPv4)” and click on “Properties”.
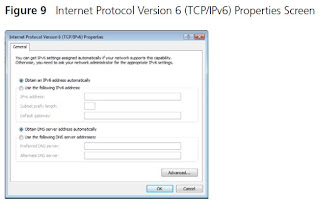
- Ensure that the options Obtain an IP Address automatically”, and “Obtain DNS servers automatically” are both selected. Click OK.
- Restart your computer.


3. ISP CONNECTION METHODS
Before you can configure the Router you need to know the IP information allocation method used by your ISP.
Static IP Address (DSL or Cable)The ISP provides the IP addressing information for you to enter manually. To configure the Router you will need to know the following:
PPTP (DSL or Cable)
PPTP is only used by some European providers. If the installation instructions that accompany your modem ask you to setup a dialup connection using a PPTP VPN tunnel then select this option. Note that when you install the Router, you will not need to use the dialup VPN on your PC anymore. To configure the Router you will need to know the following: Username, Password, Service Name (if required by your ISP), and VPN Server address (usually your modem).You will be asked for the IP Allocation Mode when you run the Setup Wizard.
4. RUNNING THE SETUP WIZARD
- Restart your computer.
- Launch your web browser and attempt to contact the Router by typing the following URL in the location bar: http://192.168.1.1. If you can access the Login page, then your computer has correctly received an IP address from the Router.
- Login using the default password admin. The Wizard will attempt to launch automatically, but if it fails, select the Wizard tab and click on the Wizard button.
- Where possible, the Wizard will recommend settings for most parameters. However, there are some settings which you must provide. Most of these will have been provided to you by your ISP when you set the account up.
- 3Com recommends that you leave the LAN IP address for the router at the factory set default address of 192.168.1.1. However, if you should choose to change it; make a note of the new address.
- When the DHCP Server Settings page is displayed, make sure that the Enable the DHCP Server with the following settings option is selected.
Connecting to the InternetWhen the Wizard has completed, attempt to browse to an Internet web site, such as www.3com.com. If you can successfully access this site, then your computer, Router and Cable/DSL modem have been correctly configured.
5. CONNECTING TO THE WIRELESS LAN
- After you have configured the Router via the wired computer, you can connect to the Router via a wireless computer. The Router and wireless clients must have both the same SSID and the same encryption settings. All wireless clients must use Infrastructure mode.
- The default wireless settings for the Router are:
 clients have the default SSID, channel and encryption as detailed above.
  If you have an existing Wireless LAN, configure the Router to use the same SSID and encryption settings to be compatible with your existing wireless network.
 - If your computer has both a wired and wireless NIC installed, you must ensure that only one NIC is used to communicate with the LAN. To use the wireless NIC, unplug the Ethernet cable and reboot your computer.
- Launch your web browser and attempt to browse to an internet web site such as www.3com.com. If you can successfully access this site, then your wireless computer, Router and Cable/DSL modem have been successfully configured.
- 3Com strongly recommends that you enable WPA encryption to improve the security of your wireless network and you change the SSID to something other than the default.


