Friday, April 1, 2011

LINUX - apt-get utility

Some examples of uses for the apt-get utility:
  • Install a Package: Installation of packages using the apt-get tool is quite simple.
    sudo apt-get install <service name>
  • Remove a Package: Removal of a package or packages is also a straightforward and simple process. To remove the package installed, type the following:
    sudo apt-get remove <service name>
  • Update the Package Index: The APT package index is essentially a database of available packages from the repositories defined in the /etc/apt/sources.list file. To update the local package index with the latest changes made in repositories, type the following: 
    sudo apt-get update

  • Upgrade Packages: Over time, updated versions of packages currently installed on your computer may become available from the package repositories (for example security updates). To upgrade your system, first update your package index as outlined above, and then type:
    sudo apt-get upgrade


  •  

Tuesday, March 1, 2011

Setup Router


1. INSTALLING YOUR ROUTER
  1. Connect the power adapter to the Router and wait for the Alert LED to stop flashing.
  2. Ensure that your modem and computer are both switched on.
  3. Insert one end of the supplied Ethernet (RJ-45 Category 5) cable into the Cable/DSL port on the rear panel of the Router.
  4. Insert the other end of the cable into the RJ-45 port on your cable or DSL modem. Check that the Cable/DSL status LED lights on the Router. 
  5. Connect the cable or DSL modem to the Internet.
  6. Connect your computer to one of the four LAN ports on the Router using an Ethernet cable. Check that the corresponding LAN status LED on the Router lights.  
To share your Router with more than four users you will need an additional Switch. Connect a LAN port of your Router to the Switch, e.g. 3Com Switch 8 (3CFSU08).

2. CHANGING YOUR COMPUTER'S CONFIGURATION
Obtaining an IP Address automatically.
Follow the instructions below for your particular operating system to ensure that your computers are configured to obtain an IP address automatically.

For computers using Windows Vista.
  1. From the Windows Start menu, select “Control Panel”.
  2. Click on “View Network and task” which is under “Network and Internet Connections”.
  3. Click on “Manage Network Connections”.
  4. Right click on “Local Area Connection Status” and select “Properties” from the pull down menu.
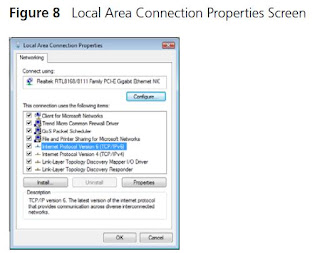
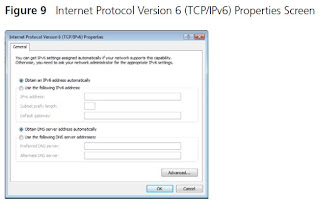
  5. Select “Internet Protocol version 4 (TCP/IPv4)” and click on “Properties”.
  6. Ensure that the options Obtain an IP Address automatically”, and “Obtain DNS servers automatically” are both selected. Click OK.
  7. Restart your computer. 
3. ISP CONNECTION METHODS
Before you can configure the Router you need to know the IP information allocation method used by your ISP.
Static IP Address (DSL or Cable)
The ISP provides the IP addressing information for you to enter manually. To configure the Router you will need to know the following:
PPTP (DSL or Cable)
PPTP is only used by some European providers. If the installation instructions that accompany your modem ask you to setup a dialup connection using a PPTP VPN tunnel then select this option. Note that when you install the Router, you will not need to use the dialup VPN on your PC anymore. To configure the Router you will need to know the following: Username, Password, Service Name (if required by your ISP), and VPN Server address (usually your modem).
You will be asked for the IP Allocation Mode when you run the Setup Wizard.
4. RUNNING THE SETUP WIZARD
  1. Restart your computer.
  2. Launch your web browser and attempt to contact the Router by typing the following URL in the location bar: http://192.168.1.1. If you can access the Login page, then your computer has correctly received an IP address from the Router.
  3. Login using the default password admin. The Wizard will attempt to launch automatically, but if it fails, select the Wizard tab and click on the Wizard button.
  4. Where possible, the Wizard will recommend settings for most parameters. However, there are some settings which you must provide. Most of these will have been provided to you by your ISP when you set the account up.
  5. 3Com recommends that you leave the LAN IP address for the router at the factory set default address of 192.168.1.1. However, if you should choose to change it; make a note of the new address.
  6. When the DHCP Server Settings page is displayed, make sure that the Enable the DHCP Server with the following settings option is selected.
Connecting to the Internet
When the Wizard has completed, attempt to browse to an Internet web site, such as www.3com.com. If you can successfully access this site, then your computer, Router and Cable/DSL modem have been correctly configured.


5. CONNECTING TO THE WIRELESS LAN
  1. After you have configured the Router via the wired computer, you can connect to the Router via a wireless computer. The Router and wireless clients must have both the same SSID and the same encryption settings. All wireless clients must use Infrastructure mode.
  2. The default wireless settings for the Router are:                                       clients have the default SSID, channel and encryption as detailed above.                                              If you have an existing Wireless LAN, configure the Router to use the same SSID and encryption settings to be compatible with your existing wireless network.
  3. If your computer has both a wired and wireless NIC installed, you must ensure that only one NIC is used to communicate with the LAN. To use the wireless NIC, unplug the Ethernet cable and reboot your computer.
  4. Launch your web browser and attempt to browse to an internet web site such as www.3com.com. If you can successfully access this site, then your wireless computer, Router and Cable/DSL modem have been successfully configured.
  5. 3Com strongly recommends that you enable WPA encryption to improve the security of your wireless network and you change the SSID to something other than the default.

Thursday, February 24, 2011

Remote Admin

Remote administration merujuk kepada sebarang cara mengawal sebuah komputer dari satu lokasi terpencil.

Perisian yang membenarkan pentadbiran dari jauh (Remote administration) menjadi semakin biasa dan sering digunakan apabila ia sukar atau tidak praktis menjadi secara fizikal berhampiran suatu sistem supaya gunakan ia, atau supaya bahan jaringan laluan yang tidak boleh didapati dalam satu lokasi, misalnya menonton BBC iPlayer dari luar United Kingdom. 

Satu lokasi terpencil boleh merujuk sebuah komputer di satu bilik berikutnya atau satu pada sebelah dunia yang lain. Ia mungkin juga merujuk kedua-dua sah dan tdk sah (iaitu penggodaman) pentadbiran dari jauh.

Keperluan :-

1. Internet connection
  • kedua-dua sistem sepatutnya dikaitkan kepada internet , dan alamat IP tuan rumah / sistem perkhidmatan mesti diketahui
  • perlu mempunyai static IP
2. Connecting
  • bila client dihubungkan kepada komputer host, window menunjukkan Desktop komputer host biasanya muncul
  • client boleh mengawal host seolah-olah dia duduk dengan betul di depan ia
Common tasks yang biasa remote administration digunakan

General
Mengawal sendiri satu komputer dari satu lokasi terpencil (contohnya; untuk akses perisian pada sebuah komputer peribadi dari satu internet café).

Shutdown
Menutup atau boot semula komputer lain melalui satu rangkaian

Accessing Peripherals
Menggunakan peranti rangkaian, seperti pencetak
Mendapatkan semula data aliran, seperti sistem CCTV

Modifying
Edit seting registry komputer lain
Meminda sistem services
Memasang perisian pada satu lagi mesin
Meminda kumpulan-kumpulan logik

Viewing
Remotely membantu(assisting) lainnya
Supervising komputer atau penggunaan internet
Akses ke "Computer Management" snap-in dalam sistem remote

10 PERISIAN POPULAR


Wednesday, February 23, 2011

Patch Network Node


PASANG RJ-45

Tujuan :

       1. Jalur kabel UTP
       2. Buka pintalan wayar kabel UTP
       3. Pasang dan "crimp" RJ-45 Connector pada kabel UTP
       4. Uji Patch Cord

Peralatan, Kelengkapan @ Bahan :

       1. Kabel UTP
       2. Crimping Tools
       3. RJ-45
       4. Stripper
       5. Kabel tester
       6. Marker pen
       7. Duster

Langkah kerja :

1. Jalur kabel UTP
  • Jalur kabel UTP mengikut pjg yg dikehendaki,iaitu, 2 inci daripada hujung jaket luar kabel.
  • Jalur dan buang jaket luar kabel dgn stipper. Pastikan ia tdk merosakkan kabel semasa melakukan kerja ini
  • Pastikan hujung wayar 1/2 inci daripada hujung jaket luar kabel. Jika tdk, pemasangan kabel pd RJ-45 tdk dpt dipasang dgn kemas.

 
2. Buka pintalan wayar kabel UTP

  • Asing pasangan wayar berpintal kepada 4 pasangan 
  •  Urai simpulan wayar pd kabel dan luruskan ia supaya senang diatur. Potong hujung wayar pd kabel agarsemuanya sama panjang.
      

     3. Pasang dan "crimp" RJ-45 Connector pada kabel UTP 
    • Pegang RJ-45 Connector dgn klipnya menghadap ke bawah dan mukaannya menghadap keatas. Susun dan masuk wayar kabel UTP mengikut susunan warna Type B ke dlm bukaan RJ-45 Connector.


    •  Kepitkan kabel UTP yg telah disusun ke dalam RJ-45 Connector dgn menggunakan crimping tools. 


     4. Uji Patch Cord
    • Plug  satu penghujung kabel (RJ-45) kpd jack di atas Master Unit Network CableTester dan penghujung satu lagi kpd Remote Terminator.
    • Tekan butang Power, dan LED pada butang Power akan menyala utk menunjukkan ia berfungsi dgn baik.
    • Tekan butang On pd masa yg sama LED di atas Cable Tester akan mula menyala satu persatu utk mengesan sebarang kerosakan. jika tiada kerosakan semua LED akan menyala hijau. Tetapi jika LED bernyala merah atau tdk menyala lansung, ia menunjukkan berlakunya kesilapan pd penyambungan.


    Monday, February 7, 2011

    Basic Network Cabling


    Kabel LAN merupakan media transmisi Ethernet yang menghubungkan peranti-peranti jaringan dalam jaringan komputer.

    Jenis-jenis kabel :
    • twisted pair
    • coaxial 
    • fiber optic
    Coaxial ==> digunakan pada Ethernet 10Base2( thinnet) dan 10Base5( thicknet)
       ==> 500 meter dalam satu segmen
    Twisted pair terbahagi kepada UTP (Unshielded Twisted Pair) dan STP (Shielded twisted pair)

    Gambar diatas ini menunjukkan detail komponen dari kabel lan UTP dan STP.
    Standard UTP
    1. Kabel LAN UTP Cat 1, dipakai untuk jaringan telefon.
    2. Kabel LAN UTP Cat 2, kecepatan maksimum 4 Mbps.
    3. Kabel LAN Cat 3, dengan kecepatan maksimum 10 Mbps.
    4. Kabel LAN UTP Cat 4, kecepatan maksimum adalah 16 Mbps.
    5. Kabel LAN Cat 5, kecepatan maksimum 1 Gigabps, sangat popular untuk kabel LAN desktop.
    6. Kabel LAN UTP Cat 5e, dengan kecepatan maksimum 1 Gigabps, lebih mahal dari Cat 5 akan tetapi lebih bagus untuk jaringan Gigabit.
    7. Kabel LAN UTP Cat 6, kecepatan maksimum adalah 1 Gigabps++.
      Identifikasi UTP

      Ada dua jenis standard iaitu:
      • T568-A adalah kabel LAN UTP jenis straight through, hujung kedua penempatan kabel pada pin-pin konektor RJ-45 adalah sama.
      • T568-B adalah kabel LAN UTP jenis cross-over. Perhatikan pada kabel cross-over ini, pasangan pin 2 dan 6 dan pasangan pin 1 dan 3 bertukar tempat.

        Menghubungkan peranti

        Untuk menghubungkan dua jenis peranti yang berbeza, gunakan kabel lan UTP straight-through. 
        Sementara jika ingin menghubungkan dua peranti yang sejenis, gunakan kabel lan cross-over.


        Fiber optic
        Fiber optic merupakan media transmisi terkini untuk standard Ethernet dalam kabel LAN. Perbezaan utama dalam hal fungsi antara kabel fiber optic dan kabel electric adalah seperti berikut:
        • Jarak lebih jauh
        • Jauh lebih mahal
        • Kurang interferensi magnetic 
        • Dapat mencapai keceptan sampai 10Gigabits

        Ada dua jenis kabel lan dalam fiber optic:
        • Multimode (MM), menggunakan ukuran diameter fiber optic lebih luas
        • Single mode (SM), menggunakan diameter fiber optic sangat kecil. Jenis ini sangat mahal kerana proses fabriknya. Kabel optic ini boleh mencapai jauh lebih panjang dari pada jenis optic MM.

        Connector optic

        Dua strand optic untuk kedua arah masing-masing untuk transfer dan recieved
        Bagaimana menghubungkan setiap bangunan dengan menggunakan kabel LAN berdasarkan pengetahuan kita tentang kabel LAN diatas? 

        Gambar berikut ini adalah gambar best practice cara menghubungkan dua partition dengan kabel LAN. Dalam senario ini, kita menggunakan kabel LAN outdoor UTP Cat5e. Juga boleh menggunakan kabel LAN UTP crossover. Kabel crossover saling disambungkan pada port trunk dari switch yang akan disambungkan. 


        • Drop cable adalah kabel yang menghubungkan setiap computer dengan switch. 
        • Kabel lan ini seharusnya memakai kabel UTP Cat 5e dengan hujung masing-masing mempunyai connector RJ-45. 
        • Kabel LAN minimum adalah 0.6 meter dan maksimumnya adalah 100 meter.
        Gambar berikut ini gambaran sederhana tentang cara menghubungkan kabel LAN antara switch dengan komputer dalam jaringan anda. 

        • Wall jack adalah titik hubung yg boleh menghubungkan RJ-45 dan RJ-11.
        • Patch cable adalah segmen kabel UTP yang dipakai untuk menghubungkan interface jaringan ke wall jack atau untuk menghubungkan bahagian-bahagian lain.
        • Patch panel merupakan panel penghubung (multi-port) - menghubungkan kabel-kabel ke peranti-peranti atau hardware penghubung lainnya seperti switch.


        Tuesday, January 25, 2011

        Encryption

        • mengubah bahasa yg difahami (plaintext) mengguna key @cipher kpd bahasa yg tdk difahami (ciphertext)
        cth: crash > Cr45Hh
        • boleh jg digunakan utk mendptkan strong password
        • yg sering digunakan sekarang adalah ceaser cipher 


                 cth:
                 plaintext:    ABCDEFGHIJKLMNOPQRSTUVWXYZ
                 cipher:       DEFGHIJKLMNOPQRSTUVWXYZABC

        Cth1:  MRP S SDVDU PDODP
                  JOM P PASAR MALAM

        encryption algorithm
        • PGP (Preety Good Privacy)
        • ceaser cipher
        • 3DES/DES
        • MDS HASH
        • terdapat 3 jenis tulisan rahsia (cryptography)
        1. symmetric key - single key
        2. asymmetric key - double key
        3. hashing

        Security Attack

        masalah yg sering dihadapi oleh Windows;
        1. Virus
        2. Trojan
        3. IP Starting
        4. D-Dos

        cara utk hack/scan komputer lain
        1. SQL injection
        2. Scanner
        software lain yg blh digunakan
        1. IP Scanner / IP Anggry
        2. Wireshark
        3. nmap
        4. Brutus
        5. netstanble (utk wireless)
        6. GFI LBN
        7. netcut
        8. kismet
        cara utk menangani Security Attack
        1. Antivirus
        2. Firewall
        3. Encryption
        4. IP Segmentation
        5. IP Security (IPSec)
        Perbezaan ant Hashing. Symmetric dan Asymmetric

        • Symmetric encryption may also be referred to as shared key or shared secret encryption. In symmetric encryption, a single key is used both to encrypt and decrypt traffic.  
        • Common symmetric encryption algorithms include DES, 3DES, AES, and RC4.
        • Symmetric encryption algorithms can be extremely fast, and their relatively low complexity allows for easy implementation in hardware. Asymmetric encryption is also known as public-key cryptography.
        • Asymmetric encryption differs from symmetric encryption primarily in that two keys are used: one for encryption and one for decryption.
        • The most common asymmetric encryption algorithm is RSA.
          • Compared to symmetric encryption, asymmetric encryption imposes a high computational burden, and tends to be much slower.
          • Hashing is a form of cryptographic security which differs from encryption.
          • Whereas encryption is a two step process used to first encrypt and then decrypt a message, hashing condenses a message into an irreversible fixed-length value, or hash
          • Two of the most common hashing algorithms seen in networking are MD5 and SHA-1.

          • Hashing is used only to verify data; the original message cannot be retrieved from a hash.

          Thursday, January 20, 2011

          LINUX


          -          tak support utk game
          -          better guna cmd dr GUI, GUI buatkan PC lembab
          -          utk masuk ke dlm cmd, Ctrl + Alt + F1


          contoh scenario ;

           1. Utk buat folder dlm folder

           #mkdir selasa
          #cd selasa
          #mkdir rabu
          #cd rabu
          #mkdir khamis
          #cd
          #ls
          2. Utk remove folder

          #rm  -r rabu
          #y
          #y
          #y
          #y
          3. U tk buat doc


          #cat  >shopping.txt
          #limau
          #oren
          #bali
          #betik
          #ctrl + D
          #ls
          4. Utk rename/copy doc/folder

          #cp shopping.txt  kedai.txt
          #ls
          @
          #mv dhopping.txt  kedai.txt 
          5. Utk move doc ke folder lain
            #cp/rppt/dog/cat/mouse/mouse.txt   /root/dog/cat
          6. Nak edit doc

          #cat  >>shopping.txt
          @
          #vi kucing.txt
          #saya suka kucing
          #  :wq                                    w-write only
                                                                       q-quit only
          7. Nak cari fail
           #rpm  -qa samba*
          8. Nak resfresh network card

          #ifconfig eth0 down
          #ifconfog eth0 up
          Kalau tak boleh,
          #/sbin/ifconfig eth0 down
          #/sbin/ifconfig eth0 up
          9. Utk installCD

          #cd  /
          #cd  /media
          #ls
          #cd  Centos_5.3_Final
          #ls
          #cd Centos
          #ls
          #…………………. (xdpt hbh dr SME)
           
          Contoh lain; 

          #mkdir fatin
          #cd fatin
          #cat  >setup.txt
          #ctrl + D
          #cd
          #mkdir USR
          #cd USR
          #mkdir opensource
          #cp  /root/fatin/setup.txt    /root/USR/opensource/setup.bak
          #ls1

          Wednesday, January 19, 2011

          Bandwidth Management

          Proses utk mengukur dan mengawal komunikasi (lalulintas, packets) dlm hubungan rangkaian, utk elak overfilling the link, kerana ia akan menyebabkan kesesakan network dan performance.

          Management
                          Mekanisma dlm bandwith management blh digunakan dlm engineer performance, includes :
          1.       Traffic shopping (rate limiting)
          2.       Scheduling algorithms
          3.       Congestion avoidance
          4.       Bandwidth reservation protocols/algorithms
          Link Management
                          Isu-isu yg mengehadkan prestasi satu hubungan yg diberi termasuk :
                          IP            : 192.168.100.100
                          S/M       : 255.255.255.0
                          D/G        : 192.168.100.1
                          DHCP     : 192.168.100.1
                          DNS       : 202.188.133
                                                         132

          Monday, January 3, 2011

          IP Subnetting And CIDR

          Classless Inter-Domain Routing (disingkat menjadi CIDR) adalah sebuah cara alternatif untuk mengklasifikasikan alamat-alamat IP berbeza dengan sistem klasifikasi ke dalam kelas A, kelas B, kelas C, kelas D, dan kelas E.
          • Sebagai contoh, alamat IP kelas A secara teori menyokong hingga 16 juta host komputer yang dapat berhubung, satu jumlah yang sangat besar. 
          • Kenyataannya, pengguna alamat IP kelas A ini jarang memiliki jumlah host sebanyak itu, sehingga meninggalkan banyak ruangan kosong di dalam ruang alamat IP yang telah disediakan. 
          • CIDR dikembangkan sebagai satu cara untuk menggunakan alamat-alamat IP yang tidak terpakai tersebut untuk digunakan di mana saja.
          Class A  -  10.1.1.10
          Subnet Mask  -  255.0.0.0
                                    11111111.00000000.00000000.00000000
                                     10.1.1.10/8  > CIDR mewakili network

          Class B  -  172.168.30.31
          Subnet Mask  -  255.255.0.0
                                    11111111.11111111.00000000.00000000
                                     172.168.30.31/16 

          Class B  -  192.168.100.1
          Subnet Mask  -  255.255.255.0
                                    11111111.11111111.11111111.00000000
                                     192.168.100.1/24

          Syarat_Syarat IP Address

          1. Bit dlm octet pertama tdk boleh semua kosong dan satu.
          cth: w.x.y.z
          00000000.11100011.00000000.11111011
          0.227 .0.251
           2. Bit dlm octet terakhir tdk boleh semua kosong atau satu.
          cth: 192.168.1.0
              .00000000 > network address
                192.168.1.255
            .11111111 > broadcast address
          192.168.1.1 - 192.168.1.254 > range utk valid address
           3. Octet pertama tdk boleh bermula dgn "127".x.y.z
               *127 adalah loopback

          Subnet Mask

          Subnet mask adalah istilah teknologi maklumat yang mengarah kepada angka binari 32 bit yang digunakan untuk membezakan network ID dengan host ID, menunjukkan letak suatu host, samada berada di jaringan local atau jaringan luar.
          Atau dengan kata lain, mekanisma pengiraan untuk memecahkan satu rangkaian kepada pecahan rangkaian yang lain.

          Bit-bit subnet mask yang didefinisikan, adalah sebagai berikut:
          • Semua bit yang ditujukan agar digunakan oleh network identifier diset ke nilai 1.
          • Semua bit yang ditujukan agar digunakan oleh host identifier diset ke nilai 0.
            Setiap host di dalam sebuah jaringan yang menggunakan TCP/IP memerlukan subnet mask meskipun berada di dalam sebuah jaringan dengan satu segmen saja.